How to use Pocketforge
April 5, 2024 ◇ 6 min read


Table of content:
- Installation
- New campaign
- App Layout
- Character creation and Hero tab
- Tracks
- Delves, Derelicts and Vaults
- Locations
- Factions
- Custom assets, themes and domains
- Export and Import
- Generate HTML
- Links
New Installation
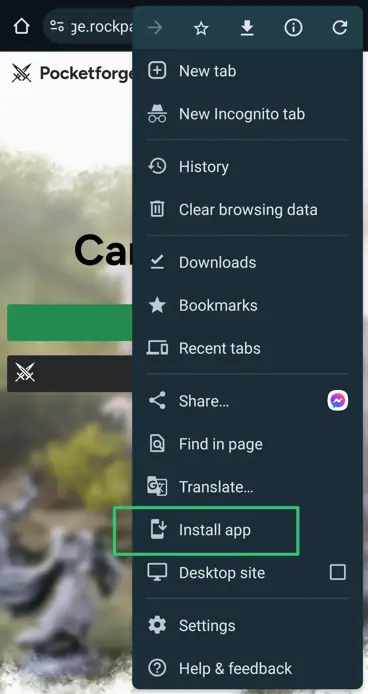
To install Pocketforge locally and use it offline, make sure you are connected to the internet and click Install at the top right of the address bar.

On mobile, it's usually in the expandable browser menu under the label "Install app".
After installing it, it's best to browse it for a bit to make sure everything has been successfully downloaded for offline use.
New campaign
In Pocketforge you can play both Ironsworn and Starforged or even mix it up as you see fit. When creating a new campaign, select your campaign theme and character rules. For a core experience, select the same option for both.
Campaign theme will set the default origin of created characters, locations and sidebar to selected theme, using either Ironsworn or Starforged oracle tables for content generation. Selected theme will also setup app settings to show Delves in the navigation tab if Ironsworn was selected or Derelicts and Vaults if Starforged was selected. Once inside the campaign, you can change the settings to show which navigation tab you want active anytime by clicking the settings icon in the upper right corner.
Character rules will set character tracks and conditions, Bonds for Ironsworn and Bonds, Quests and Discoveries for Starforged.
Activating Sundered Isles option will use Sundered Isles oracle tables to generate content and enable the use of cursed die. It can be disabled and reactivated anytime in app settings, allowing you to play standard Ironsworn or Starforged and switch to Sundered Isles at will.

App layout
App header
Aside from the theme/rules icon and campaign name, the header contains app settings and a menu with links on its right side. Campaigns link will redirect you to the starting campaign selection screen.
In app settings, you can select a color scheme (light/dark), active navigation tabs, Sundered Isles mode and options to export/import campagins, export/import saved data and generate HTML page from your journal logs. Saved data includes all exported content from your campaigns: heroes, NPCs, locations and factions.
Sidebar
The sidebar on the right side of the screen has a collection of oracles and moves from Ironsworn, Starforged and Sundered Isles. Pay the Price and Ask the Oracle are always visible on top for ease of use. Each oracle roll can be added to the journal text editor by clicking add to journal icon. Journal with the last entry will show up on the bottom of the sidebar once you switch to any navigation tab other than Journal. This way, you can work on your log while another tab is active without the need to switch back.
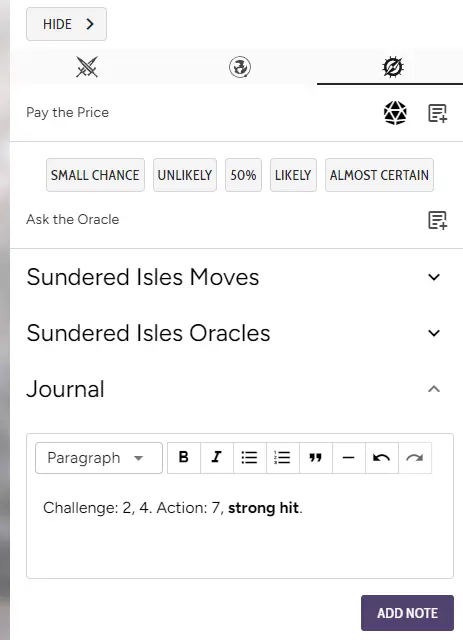
Dice roller
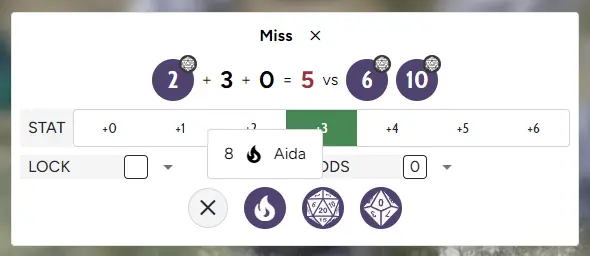
On the bottom side, you can find a die icon which will activate dice roller. On a dice roller, you can set Stat with which you want to roll, lock your action die and set adds. Once an action roll is made, you can reroll any die or burn momentum if you currently have a hero with enough momentum score or negative momentum that can cancel action die.
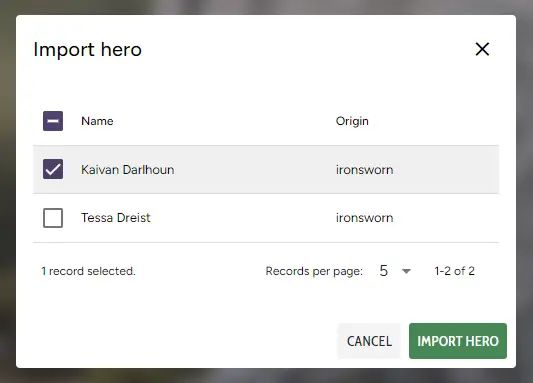
Character creation and Hero tab
To create a new hero, in the hero tab, click "Add hero" or "Import hero" if you have previously exported characters that you want to play. Set "origin" if you want to generate something other than the default one set during campaign creation and fill or roll as many fields as you want or just click "Create" and let the app generate content randomly. Once a hero is created, you can edit it, convert it to a NPC and export it. Set your character Edge, Heart, Iron, Wits and Shadow stats, pick your Assets in the Asset tab below the character info and you're ready to go. In character details and edit modal you'll find much more info about your character that was generated during the creation process. It is by design to inspire you with new ideas and interesting combinations, you can tweak and edit everything anytime.
Assets
The Add asset modal is equipped with a selection tab, filters and a search bar. The search bar will search only for filtered assets in a selected tab. For example, if you're on the Starforged tab with only Companions assets active, you won't be able to search for Path assets. The third tab, Random, allows you to randomly draw assets. It has its own filters, by default it will draw from both Ironsworn and Starforged decks.
Debilities and Impacts
When checking any debility or impact, you don't have to change your maximum momentum and momentum reset, it will be changed automatically, so you don't have to set your maximum momentum manually. A warning icon will appear on the tab once it has any condition checked, so you don't forget you have active conditions.
Tracks
The track tab is used for all sorts of tracks, while personal vows are best stored on the hero panel in the tracks section, this is a perfect place for journeys, explorations, scene challenges and combat.
NPCs
Similar to Hero creation, you can add new NPCs with the "Add NPC" button and fill in as much info as you want. The only really important part is origin, which dictates oracles used during NPC generation. Everything else can be edited anytime. Just like with heroes, it generates most of the character info using oracles to prevent falling in the same schemas and common tropes. If you want to add a few NPCs at once, check the "Add next NPC" box, so that modal won't close upon NPC creation.
NPCs can be converted to Heroes and exported. If you want a NPC to have a personal quest available, there's a special Quests tab description below.
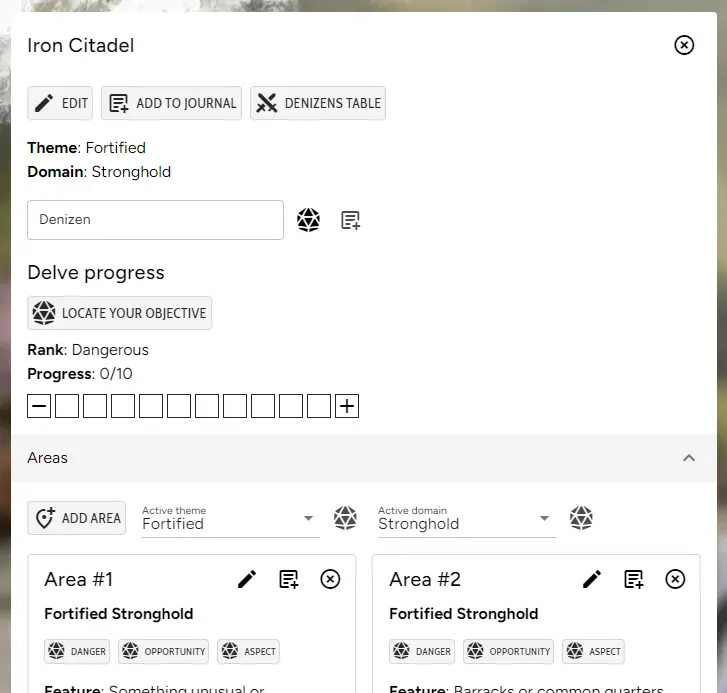
Delves, Derelicts and Vaults
Delves, Derelicts and Vaults tabs help to visualize instances and keep everything in one place. Upon adding new instances, you don't have to fill in anything at all, everything will be generated automatically. If you have a specific instance in mind, it's best to set Theme, Domain and Secondary Theme/Domain if needed, and a Rank in case of Delves, Type and optionally, Theme in case of Derelicts and optional Theme for Vaults.
Once an instance is created, it will have its own progress track assigned that you can resolve and reactivate at any time and Areas/Zones tab that generates waypoints based on chosen themes and domains. Vaults have separate Zones for Interior and Sanctum. Each waypoint can be edited with a custom name and on each you can roll its Ironsworn/Starforged features like dangers and opportunities. If you don't like what was rolled, it's possible to reroll everything or just input custom text.
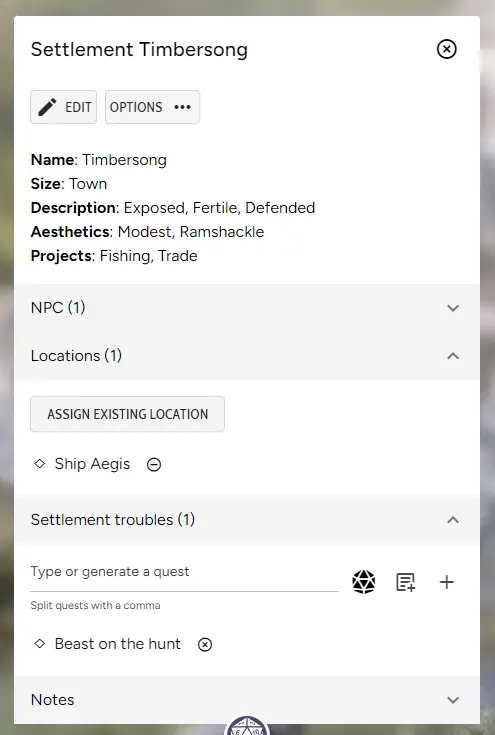
Locations
In the locations tab, it's possible to create Settlements, Waypoints, Planets and Starships. The type of location is not generated randomly and has to be selected manually.
Once created, you can export the location for use in another campaign, add NPCs or create new NPCs that are located in a selected location and add settlement troubles, quests or missions. By assigning an existing NPC to a new location, the NPC will be moved from its previous location if there was any and the NPC panel will be updated automatically.
Factions
Factions work similar to locations. Once a faction is created, it can be exported and its possible to assign existing characters, including heroes, or add new NPCs that will be automaticallt assigned to a selected faction. By changing NPC faction, it will be removed from the previous one automatically. Factions don't have quests or troubles, instead it's better to assign those to locations in which factions are active or faction members.
Custom assets, themes and domains
Inactive by default, you can add custom assets, themes and domains. Once created, custom assets will appear in the hero asset picker modal and custom themes/domains will be available in instances.
Export and Import
You can export and import all your campaigns by clicking "Export campaigns" and "Import campaigns" in the app settings menu. This allows you to easily switch devices and keep your campaigns info or save it as a backup. Keep in mind that when importing campaigns, new info will overwrite the old one.
Heroes, NPCs, locations, factions, custom assets and custom themes/domains can be exported from one campaign and imported into another. This way, if you want to use previously generated content, you can do it with ease without manually copy-pasting everything. Exported content can be downloaded with the "Export saved data" button in the app settings menu.
Generate HTML
By clicking "Downlod Journal" in the app settings menu, an HTML file filled with all your journal logs will be generated and downloaded. This can serve as your campaign summary once you are done with it and don't want to keep it on the list of active campaings.
Links
If you want to try using Pocketforge yourself, you can find it here.
If you want to read actual play in which I used Pocketforge, you can check Ironsworn: Beast of Cindermeet, Ironsworn and D&D: A Most Potent Brew or browse all actual plays.
Thanks for reading!